Getting Familiar With Your Mandolin
Now that you're a proud mandolin owner, it's time to learn how it works. Look at the illustration, and we'll go over it inch by inch.
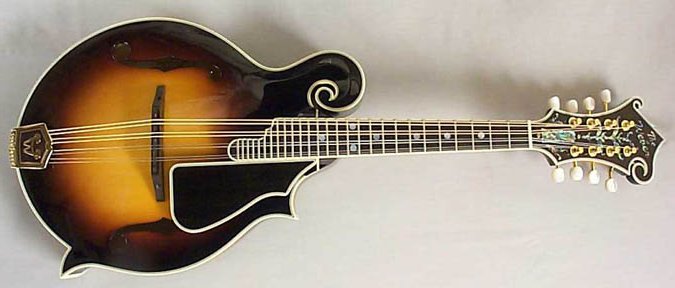
At the very top is the peg head. The peg head supports eight tuning keys, which are used to tune the eight mandolin strings. Depending on the angle at which your tuning keys are sitting, you might be able to see a small hole in it, through which the string is threaded. The peg head is also usually where the manufacturer puts their name. So if you see someone sneaking a covert glance at your peg head, they’re usually trying to find out who made the mandolin you are playing.
The nut sits in between the peg head and the neck. If you look closely at the nut, you can see tiny grooves in it. These grooves hold the strings steady, and keep them from getting pushed all over the place when you touch the strings. These grooves eventually wear down over time. If they become too wide, it allows your strings to roll while you play. If they become too deep, they can prevent your strings from vibrating and your instrument will not get a good sound. These are problems that are easily repaired by a qualified luthier.
The neck is the long thin piece that connects the peg head to the body. The fingerboard is on the top side of the neck. - that's the part that your fingertips will touch. The fingerboard should be flat, with no grooves or worn spots.
The fingerboard is bisected over its entire length, by wires that are embedded in it. These wires are called frets. When you play the mandolin, your fingers should go BEHIND the frets, not ON the frets. When you press your finger behind a fret, you push the string tight against the fret. That action changes the sound that the string makes, and so produces the note you're playing.
The bridge serves two purposes. The first is to act as a partner with the nut, and keep your strings from rolling while you play. The bridge also has tiny grooves in which your strings sit and, like the nut, can become worn with age and cause poor sound. The bridge also controls the instrument's "action". The action refers to the distance that the strings sit above the fingerboard. Some players prefer that the strings sit very high and away from the fingerboard, because they hit the strings very hard with their fingertips while they play. If the action is high, then the strings will serve as a sort of trampoline, to cushion the impact of their fingertips on the fingerboard. Another player with a gentler touch might find the same mandolin difficult to play, because they have to press extremely hard to hold the string down against the fret. There is no good or bad action – it's strictly a matter of personal preference. But if you find your mandolin physically difficult to play, you might want to consider having the action adjusted, which is accomplished by slightly raising or lowering the height of the bridge. Some bridges have little wheels on the sides – that's why they're there. Others have small holes through which a wrench is used to adjust the height.
The tailpiece is ornamental – it covers the ends of the strings. It is usually removed fairly easily – on most mandolins, it just slides (not pulls) off. Hold the body of your mandolin firmly with one hand, and, using a sliding motion, gently push the tailpiece away from the body. Mine gives some slight resistance, and then pops off very suddenly. If you're nervous about it, ask an experienced mandolin player to remove it the first time, just so you know what to expect. But the tailpiece is intended to be taken on and off, so that you can put new strings on your instrument. We'll cover more about restringing in another section. But when that task is completed, you just slide the tailpiece back on.
The end pin is used to attach one end of (hopefully) a genuine mandolin strap that is suitable for the type mandolin you have. The straps for A-Style and F-Style mandolins are very different, so if you have the wrong strap for your model, or if you trying to use a guitar strap, you may have no idea what I'm talking about here. But if you have an A-Style mandolin and an A-Style strap, the end with the hole goes over the end pin. The other end is tied above the nut, and under the strings on the peg head. If you have an F-Style mandolin and an F-Style strap, the end with the hole goes over the end pin. The other end is usually tied around the little curlicue on the body.
Soundholes can inspire passionate debate among mandolin players. Some will insist that one round hole underneath the strings is best, and others believe that having two "F" style soundholes on either side of the strings, is far superior. One manufacturer is doesn't have their sound-hole near the strings at all – they have a small apostrophe-shaped hole where the curlicue is on an F-Style mandolin. In my opinion, where the soundhole I located, and what shape it is, is not anywhere near as important as how it makes the mandolin sound. Take a flashlight and peek inside your soundhole. Depending on the manufacturer, you may see small wooden pegs or a wooden brace holding the top up. These are what give the top of your mandolin the slight arch shape, which in turn allows the wood of the instrument to vibrate. And the soundholes allow those vibrations to come out and produce that beautiful mandolin sound.